
 quilt work day here at home. I got myself set up in the living room with a fire in the woodstove on one side and football on the TV on the other. (And I certainly didn't get either of those at Red Purl!)
I decided to start the year off with my crossed canoes mini-quilt. I had a suspicion that I could get it done or nearly done with a good session. We haven't seen this quilt since July and when we left it, I had finished a good part of the quilting but didn't know what to do for the rest.
Back in October, I took it back out to try and figure it out.
I got out the foamboard, taped together enough paper to fit under the quilt, and then laid down the quilt:

I stuck all the major intersections through with pins to transfer the quilt design to the paper:


I then connected the dots.
 (It is funny how much of what you learned in elementary school you do use again later in life.)
 (It is funny how much of what you learned in elementary school you do use again later in life.)
I then played around with some curves and a pencil. (And used a lot of an eraser too.)
 Until I settled on something I thought might work:
 I then transferred it all to the quilt itself, using a water soluble blue marker on the yellow and white chalk on the blue. And then pinned the pattern and quilt onto the foamboard and lived with it for a while:
 Until I settled on something I thought might work:
 I then transferred it all to the quilt itself, using a water soluble blue marker on the yellow and white chalk on the blue. And then pinned the pattern and quilt onto the foamboard and lived with it for a while:
 Yes, that means it was literally sitting on a table in my living room since October. But the more I looked at it, the more I thought it would work. Maybe not the perfect pattern, or the best, but definitely one of possibly many successful possibilities. (I get kind of stuck on trying to find the "right" design, when really there's not really one right way to do it. Pick one and move on!)
So today, I unpinned the quilt and started sewing. First the blue central design:
 Then the yellow:

 Then the yellow:
And that meant everything was quilted--Wow!
Next step was to baste the yellow piping that I made in July around the edges:
 I did not miter the piping at the corners, but just crossed them over each other. Every strip goes under at one end and over at the other.
 I did not miter the piping at the corners, but just crossed them over each other. Every strip goes under at one end and over at the other.
 Once the strips were sewn on, I could finally cut the outside edges to size. Such a relief to finally neaten them up!
I used the tool that came with my Piping Hot Binding kit. The two grooves fit over the piping to keep everything lined up, and are spaced a half inch and a quarter inch from the edge. You can chose which of those two you want as a seam allowance.
Since this is a small quilt, I chose the quarter inch side, and cut all four sides.
 I'm telling you, there's nothing like getting the edges cut off to make you feel like you are finally getting close to the end.
 I'm telling you, there's nothing like getting the edges cut off to make you feel like you are finally getting close to the end.
Before adding the final edging (binding), I basted on the two corner hangers. They're just four inch squares folded in half diagonally.
 You put them on the back of the quilt at the upper two corners. When the quilt is done, you can slip a small dowel in the pockets and use it to hang the quilt. Pretty slick, eh? This is the first time I've tried it, so I'll let you know how it works.
 You put them on the back of the quilt at the upper two corners. When the quilt is done, you can slip a small dowel in the pockets and use it to hang the quilt. Pretty slick, eh? This is the first time I've tried it, so I'll let you know how it works.
The one thing I didn't get to was sewing the binding down to the back of the quilt (something I do by hand).
 After that is done, the quilt will be finished...oh, except for the blocking. What, blocking fabric? Yes, this is something I've learned recently: blocking's not just for wool anymore. I'll give more details when I get to it.
 After that is done, the quilt will be finished...oh, except for the blocking. What, blocking fabric? Yes, this is something I've learned recently: blocking's not just for wool anymore. I'll give more details when I get to it.
And with all that in front of me, I'll leave you with a little peak of what the finished quilt may look like:
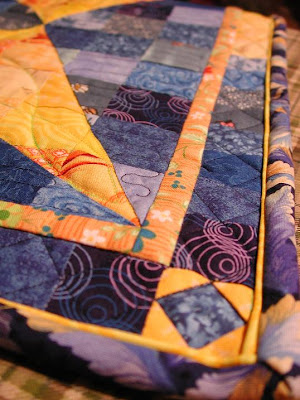
Not bad for my first quilt day of 2010!

Not bad for my first quilt day of 2010!


Great Color !
ReplyDeleteGreat job !