Monday, May 30, 2011

Starting and Restarting

I mentioned a new project that I said I was obsessed with--I've started a stole. I plan to give it to my church if it turns out nice enough. I asked someone there a while ago if they needed a new red one because I had this project turning in my mind. If they had said yes, I would have got right on it. But I never heard back. Then I decided I had to get this project out of my mind whether they wanted it or not! If not, I'll find something else to do with it.

So what is a stole? It's a little confusing as the word is more commonly used for a fur wrap worn about the shoulders. (Well, not that I see too many of those these days.) But this type of stole is basically a long scarf that is worn with its center at the back neck and each end hanging down over the front of the shoulders.

The only difference between what I'm knitting and a long scarf is the shaping given at the back so that it turns the corner while lying flat. That's the basic idea anyway.

I wanted to use my colour changing wool and I wanted to make the gradation mirror itself on the two sides. I did not want to start at one end, knit all the way around and have the colours just fall where they may. So where did that leave me?

I decided to start at the center back, knit a bias square and then knit the two long pieces off of two adjacent sides. (So it would be like two long pieces meeting at a 45^ angle.) Except I couldn't knit the two long parts separately--I would have to knit them at the same time by casting on a few extra stitches and steeking it down the middle when I was done. That way the colour changes would be the same on both sides. Brilliant right?

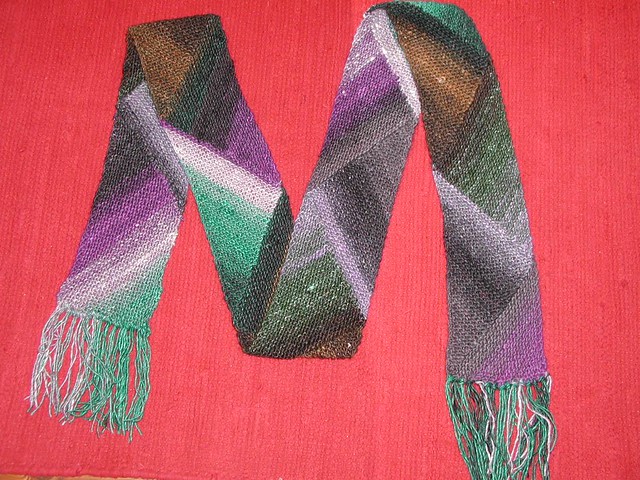
But what pattern to use? I was drawn to the Multidirectional Diagonal Scarf which I had suggested to Amy as a Red Purl knit-along a while ago and it's been a big hit ever since:
It's constructed from triangles in a garter stitch and you can see that it really does interesting things with colour changing yarn. After knitting about a third of mine, I think the scarf is better on quicker colour changes than what I'm working with, but it will still be effective. I like the triangle construction because it's interesting and because of the shape's association with the theology of the trinity. (Or Trinity? Do you have to capitalize that?)

After making some headway on the two long sides pieces, I noticed that the beginning square was wider than my pieces were now. I mulled on that for a while and finally realized that I had let my math training down (again) and failed to realized that I needed to apply a basic geometric principal. The way I had put it together I had assumed that the side of the triangle was the same length as the base. But it's not. So although my beginning square was the right dimension, my long scarf parts were too skinny.

For a while I figured it wasn't "that bad." Then I figured I could "block it out," but yesterday morning at church (before the service) I finally acknowledged that I had to redo it. So I tucked it away and on the way home, I ripped and ripped and ripped. (I really had quite a lot knitted.)

So now I am back to the beginning. I have figured out the math (thank you, Pythagorean Theorem!), how many stitches to increase and when. I have a feeling I won't be quite as obsessed now that I have a better feel for how the project is going to go (when I start something like this it's always, "just one more triangle" or "just until I finish the colour change") but it's a very easy project to take along with me and knit anywhere. That is always a good thing for finishing projects.

The only disadvantage to knitting this in public is the funny looks and blank stares when I answer the question of what I am knitting. "A stole." Yup, then comes the blank stare or funny look. People just don't know what to do with an unexpected response.

Maybe I'll just tell them I'm knitting a scarf. That should keep them happy.

Sunday, May 29, 2011

Making Progress on Making Waves

I have made good progress on my Making Waves cardigan. I finished the body a week and a half ago. The instructions tell me to do the sleeves next. I debated starting the ruffled trim instead so that I could use the same ball of yarn and the trim would match the front.

But I decided that I would rather have my sleeves match the body and the trim contrast than the other way around. (The only reason they might contrast is that at some point I'm going to have to start using the second ball of yarn. They looked pretty close, but hand painted stuff is notorious for varying from skein to skein.)

In order to do the sleeves, I "had" to order some more Harmony dpns. The size I needed was one size too big to be included in the socks set that I got. I didn't mind waiting for them, however, because I started another project that has me obsessed. I'll write more on that later.

In the meantime, I will show you where I am with this piece. I pinned the front so it would mostly hang right (remember that the trim will make it a little wider in the front yet):
I have to still fold under the hem and sew it, but the length looks pretty good. (It'll block slightly longer if anything.)
I did waist shaping as instructed as I decreased, but I only did the hip increases on the back--something I learned from making the Sahara. I do not need increases in the front; it really doesn't hang right on me.
The armhole seems to fit well. You can see the raglan shaping here:
A lot of raglan styles really emphasize the line made by the increases, but this sweater really downplays them. That's good in my opinion. I don't think the raglan style is particularly flattering on my body.

My new needles arrived this week and soon I will get going on those sleeves.

Saturday, May 28, 2011

Gob Smacked

Vogue knitting has done it again.

I really liked the issue I got yesterday (Early Fall 2011) and they have a style I have to, have to, have to make. Like right now.

Ready?

Another grey and white tunic:

Here's a slightly different view:
Are you drooling too?

Oh I love it!! I'm thinking in cream and grey from Rowan's Purelife British Sheep Breeds. (I used the DK weight of this yarn for Troy's cabled sweater. I loved working with it.) You may recall that it is an undyed wool--you get the unaltered colour of the sheep!

I also would change it to be asymmetrical. The button band would only be on one side, and the colourwork would flow continuously around the other side from front to back. As it is, it makes me think a little too much of the "card soldiers" from Alice in Wonderland. (This would be a great pattern to adapt for that, if you were really into cards.)

Now don't go and say that I just finished a grey and cream tunic and isn't one enough. I figure I won't have to buy any extra accessories. Whatever will go with one will match the other! Convincing, right? The other thing that makes me happy is that this one is an aran weight (slightly bigger than worsted) so it should fly off the needles. Convinced now?

Either way, I think I must to go to Red Purl tomorrow. I hope she's not closed for the whole holiday weekend...

P.S. Sooo many of the styles in this issue were oversized, had drop shoulders and/or other loose large square fits...as does the tunic I just finished. I felt so a la mode looking through the magazine!

Sunday, May 22, 2011

Quilting: What's Your Season?

I think for most people the season for quilting is winter. I seem to run on a different clock: summer is the time for me. (Ok, we're not really full into summer yet, but the woodstove has been retired for the season and that's close enough for me.)

In any case, I have been doing more quilting lately than I usually do. A week or two ago I made some more Big T blocks:
Last time I wrote about them, I had only five blocks and in two sessions, I managed to double that! I do two at a time now which makes things a little more efficient without being too overwhelming for me to keep track of.
I'm still enjoying picking out which fabrics to put together. So far I haven't repeated any combinations but I definitely have favourites. The blocks are still pinned to my window blind and I like being able to see them all the time!

Today I pulled the Kaffe Fasset quilt again. You may recall that I had run out of red thread. I bought a spool when I was at the store for something else but had to guess at the colour because I was unprepared. I bought the wrong colour. I managed to exchange it a week later. After all that, I thought I had better at least make some progress!

The three pieces of the quilt are all at different stages. The furthest along has all the circles done, all the red squares done and the yellow squares started. The next one has all the circles done. And the final one doesn't even have the circles done (that's where I ran out of red thread).

I decided that I needed some "no brain" quilting, so I picked up the third one and threaded the machine with my new red thread to finish sewing the circles. I was surprised that I couldn't find a red bobbin to match. How could I have run out of thread on the bobbin and spool at the same time? Even though the question occurred to me, I didn't stop to consider it any further and just started sewing.

The back of a block I did today,
with the proper blue thread.
After I finished the first section, I realized that the reason I didn't have a red bobbin was because the bobbin thread was not supposed to match; it was supposed to be blue. ::sigh::

So I did a little ripping out. When I wanted "no brain" quilting, this wasn't really what I had in mind.

After ripping, I did get that section finished and now all three pieces have at least the circles sewn.

While I had the red threaded in the machine, I figured I would continue with it. I sewed two red blocks with free motion quilting before running out of time and desire.

Thankfully, my machine has been behaving while I've been doing free motion quilting. I think the sharp needle, slowing down and cleaning out the lint formula is working.

Besides the changing of the season, I may have also been inspired to quilt by "feng shui"ing my living room. My sewing table is now in front of a window and has more convenient access to the ironing board.
The whole room feels more open the way it is arranged. I hope it leads to lots of sewing!

Thursday, May 19, 2011

It's a Truffle, not a Trifle


I'm sure you will all be relieved to hear that I have finished my Truffle Tunic! No more complaining about its unending stitches. The needle/yarn combination made my arms ache, the rough wool made my fingers sore and the colourwork was a big pain in the butt. (It's hard to believe I started this as "comfort knitting"?) But it's now done done done!

The first time I wore it, it got rave reviews from my friends. (Thank you, all.) The next day I wore it to work and not a comment from anyone. :( I guess this goes to show that we chose our friends and not our coworkers, eh?

As I suspected it does wear like a tent:
You can see it has a very simple construction--a great big T. The sleeves are super deep and there is absolutely no shaping.

A big belt is enough to tame the tent-like fit.

You may have also noticed the separate collar:
It's just a long ribbed tube pulled over my head and folded in half. It's not attached to the sweater in any way, but it looks like an attached collar when I wear it. I actually finished knitting it the evening I wore the tunic for the first time. Project Stats
Started
: 4 Sep '10 / Finished: 24 Apr '11
Pattern: Truffle by Susan Crawford (was free, but apparently now must be purchased)
Materials: grey tweed wool from 2nd hand sweater (500 g, ~$5) and Blue Sky Alpaca Sport (3 skeins, $24.30)
I knit and knit while visiting with friends and when I ran out of wool I stopped. Then I worked in the ends, snipped them off and slipped the collar over my head. Voila!

Since I ran out of yarn, the collar is about 2" shorter than the pattern called for. I think that might even be good with the alpaca I used as it is very droopy "drapey" and doesn't stand tall on its own.

I am so happy to have something long enough to wear over my jeaggins. That's what started this whole project!

Sunday, May 15, 2011

The Start of Making Waves


I have started a new cardigan. I have been watching Mary Annarella's work for a while on Ravelry. I had noticed her sweaters were lovely and in fits and colours that I loved. (She was one of the first people I friended so that I could follow all her projects.)

I didn't notice at first that she designed most of them. But when I saw that the pattern for this design was just coming out, I knew I had to have it. I really like the ruching trim detail even though I know it will be a big tedious pain in the butt. But totally worth it.

It also happened that at the same time, Amy at the Red Purl had a completely gorgeous shade of red in Fleece Artist's Saldanha (a lace weight merino wool) that would work for the pattern. Lucky me!

I cast on the last day of April just in time for the "red" month of Project Spectrum. The cardigan is knit from the top down, and I have all the shoulder and neckline shaping done. I tried the project on quickly when I got to the bottom of the armholes to make sure the armholes weren't too tight. Once that was done, the sleeves were put on waste string and the back and front were joined.

I have now finished the waist shaping and wanted to try it on again to make sure I was headed in the right direction. The big advantage of working from the top down is that you can put all your stitches onto a string and try your piece on at any time.

It is a big advantage, but I also find it to be a pain in the butt. It takes too much time to put the stitches onto a waste string, and then to put them back onto the needle. But I have to remember that it's all to save time later by preventing reknitting because of a bad fit. The problem is I think I'd rather do more knitting than spend time trying on the piece. I know...that is a rather immature way to look at things so I try to test the fit as often as necessary. (If I worked on cable needles I would probably be able to try it on with the needle in, but I like straights so I'm stuck with transferring to a string.)

Enough talk. End of the story is that I tried it on tonight and tried to see what it looked like from every angle:


The fit seemed good. I still have to add the trim to the front edge and it needs to fit with a little negative ease so that there's enough pull on the hook and eye closures to keep them closed.

And I'll just throw this one in because I thought I was having a good hair day:
Ok, quiet in the peanut gallery...I do consider this a good hair day so pipe down.

I hadn't really thought about my progress on this sweater, but looking ahead in the pattern shows me that I don't have that much more to do on the body. I could be about half way since the sleeves are 3/4 length. Oh wait...there's a lot of knitting in that trim. Ok, so maybe I'm a third of the way...

It would be nice to finish it this month for Project Spectrum, but I'm not going to push too hard on it. No matter how far I am, all I can do is keep knitting. That's the only way to get it done! The lace-weight yarn is a little thin for my taste (for how easy it is to knit, I mean; it looks great) but I am using my bamboo straights and that is always a pleasure.

Friday, May 13, 2011

May Mulligan

Ok, so I know some of you were beginning to doubt. Were thinking that I had given up and just not told you...but no, I am still working on my March Mulligans.

...and just got one finished, as a matter of fact!! I reknit the Hat Fit for a Boyfriend that I had made for Troy. He uses it as a nightcap and it was too big, too stretched out to stay on his head overnight.

I didn't notice when I knit the pattern but it calls for an aran weight yarn and I was using a worsted. So the needle size was all wrong, for one. The 2x3 rib wasn't right either.

When reknitting the hat, I started at the top so I could just increase until I had enough stitches and knit down from there. I just used the basic formula of increasing on every other row, eight times per round.
Doesn't the centre where I started look good? I cast on 4 stitches with my favourite provisional cast on (over the tail), slid the stitches to the other end of the dpn and knit one row (like you would when making an I-cord), then did my first increases and started knitting in the round. Then when I had a few rows done, I could use the tail to pull the stitches together where I first started. Worked like a charm.

I didn't bother to ravel the old hat before I started knitting. I just unwound as I needed.
So instead of a ball of wool, I had a knitted piece as my source of yarn. Sort of like a sock blank. When I was finished I only had this much left:
(But there was no adrenaline used in the making of this hat. I had half a ball of the same colour ready in case I need it.) And of course, I was trying to make a smaller hat, so I had no reason to think I wouldn't have enough yarn. (Although stranger things have happened!)

I knit the body of the hat in a smooth sturdy stocking stitch. Eliminating the rib and using smaller needles made sure the fabric wouldn't stretch out. I finished the hat with a few rounds of garter for a simple flat finish.
Troy has tried it on and deemed it much improved. Now let's hope we won't need it for a good long while!

Tuesday, May 10, 2011

Super Scarf II and Mosaic Knitting

I haven't written much about it, but I did make a second SuperBowl scarf. In fact, it looks like this scarf didn't even make it to my current projects list in the sidebar. Oops!

Well, I have been working on it on and off since early April. I saw this new pattern for a football themed scarf and couldn't resist doing a second SuperScarf.

I made the scarf one repeat shorter than the pattern called for because I was short on yarn but it is plenty long. Final dimensions were 7" by 64". I liked the pattern a lot and I hope the volunteer who gets it does too!
I filled out all the forms and hope to [finally] have the two scarves shipped off to Indianapolis this week.Project Stats
Started
: 6 Apr '11 / Finished: 29 Apr '11
Pattern: Football Mosaic Scarf by Sarah Burton (free)
Materials: Universal Yarn Classic Worsted, 651 White, 638 blue (1 ea @ $6)


One reason I wanted to make this scarf is that the pattern is made with a technique called mosaic knitting. I had never done any mosaic patterns before but have been intrigued by the look of them.

In mosaic knitting, you only ever work with one colour at a time and alternate which colour every two rows. The result is a pattern that looks like you used multiple strands when you didn't.

Here is an introduction to the technique:

This pattern starts with a row of all white stitches:
(That part's easy enough, right?)

For the next row, you knit in blue all the stitches indicated by the chart:
When you come to a stitch that is marked white, you don't knit it, but just slip it from the left needle to the right:
Then continue to knit blue stitches as indicated by the chart:
and slipping the white stitches as directed.

For the wrong side row, you're still knitting with blue and all you do is knit the blue stitches and slip the white stitches (with yarn in front):
That's the best part of Mosaic colourwork--the wrong side rows are so easy and you don't need a chart for them.

At the end of the two rows you have some blue stitches which have been knit and some white stitches that have been slipped:
As you start the next row, you are using white and simply knit the white stitches as indicated by the chart and slip the blue stitches. Easy peasy, lemon squeezy.

So if you've been scared of doing stranded colourwork for some reason, you may want to check out some mosaic patterns because you'll only ever have to work with one colour at a time. (But because it's a less common technique most people will still think you're a genius because they've never heard of it. Go ahead and use that to your advantage. I give you permission to do so.)

I will end with the note I included with the scarf:
Thank you for volunteering, for taking the time to make sure that things run smoothly and people have fun. The SuperBowl couldn’t happen without you!
I wish I could be there to help, but since I can’t I’m happy to contribute this scarf. I hope you like it. I hope you wear it in good cheer.
The scarf is knit in a mosaic design by Sarah Burton (not me). If you would like more information, you could snoop around my blog www.christinacreating.blogspot.com. I write about all my projects there.
When your scarf needs to be washed, it can be done by machine. I would recommend cold water and a gentle wash. Dry on low heat or lay flat to dry. The materials are 80% acrylic and 20% wool.

Friday, May 6, 2011

Michigan Lighthouse Project

Ok, here's the scoop. I need to make a quilt square for the 2011 County Fair raffle quilt. (Yes, "need to.")

And I need your help!

But don't worry, your help won't go unrewarded.

This year, the quilt theme is Michigan lighthouses. That is a very nice theme. The organizers want a depiction of an actual Michigan lighthouse. I have to submit the block with the name and/or location of the lighthouse.

I do not have pictures of any Michigan lighthouses. Read carefully now, this is where your part comes in: If you have a picture of a Michigan lighthouse that you think I could translate into a quilt block, please send it to me. (christinacreating [at] yahoo -dot- com)

What do you get out of it? Well, if I chose to use your photo, I will send you a quilt block of your picture. Wouldn't that be great?? I will chose the fabrics, and it will be one of the practice blocks I plan to make. (Last year I made two practice blocks before cutting into the fabric provided by the fair.)

Now, I can't promise you that you'll like the block--that is up to you. But I can promise you that I won't send out anything that I'm not proud of.

So, please look through your vacation photos, search your tags or peruse your "My Pictures" files and see what you've got. The picture should show a clear image of the lighthouse and I will need to know which one it is. (I'm sorry I can't use a picture that you know is from your trip in Michigan but can't remember where it was.)

The fair's not until the beginning of August, but I need to start working on this if I want time to do a couple practice squares...please send pictures as soon as you find a minute.

THANK YOU!! This should be fun, right?!

Wednesday, May 4, 2011

Project Spectrum Starts


I have "signed up" to be a part of Project Spectrum started by Lolly over at her blog. I'm not sure I can explain it very well so you may want to read her post about it. But the basic idea is that she wants to focus on, or you might say pay attention to, a particular colour each month with a bunch of other people online. She has a Tumblr blog going, a Flickr group, a Facebook group and of course a Ravelry group where you can share your pictures relating to the Project.

And of course, you are welcome to join to because this is certainly not just a knitting, sewing or crafting enterprise. Lolly herself will be focusing on photography and cooking this time around. (This is the fifth round of a Project Spectrum collaboration.)

It's a very loosely organized thing. You are not committing to every month or a certain number of projects. It's just a way to live in a different mindset for a while.

So each month from May to November there will be a different focus colour. We are starting in May with...RED!! Wow, what a great start for me. I pulled together a collage of red pictures I already had to get me in the mood, and I will share whatever I've collected throughout May towards the end of the month.

For knitting, however, I can tell you that I've already started...there were the slippers I made for the AIDS Walk. (With their red ribbon campaign, a good cause for a RED month!) And then I've also started Mary Annarella's Making Waves Cardigan in a most gorgeous red in Fleece Artist's Saldanha Two. It's barely started right now, but I'll show more when I have more to show.

Meanwhile I'll be keeping my eyes open for flashes of red, and why don't you try it too.

Tuesday, May 3, 2011

AIDS Walk Report

Sunday turned into the one shining specimen of a beautiful day in an otherwise crappy week. It was a great day for a Walk.

There was a good crowd and they were all in the mood to have fun. After registering and eating a lunch, I pulled out my knitting and continued working on my second slipper.

The knitting drew some attention, but the best interaction was with a fellow Raveler. Instead of opening with, "Hey my grandmother used to crochet!" she opened with, "Hey, are you on Ravelry?" For both of us, it was the first chance meet up with another Raveler. (And when we got home we immediately friended each other.)

I continued the slipper as we began the Walk and very near the end, I finished it:
Yeah!!

And who won the slippers?? A random number generator selected Mic and Martha who have been generous long time supporters of my walk. I hope they will enjoy them!

Until next year, then!

Project Details:
Pattern: Slippers Triangle Sock (vintage, free)
Materials: Red Heart Super Saver in Cherry Red (0319) (86 g)
Start Date: Apr 19 '11
Finish Date: May 1 '11

May I suggest?

I Say! or at least I did once...